
So a while back I managed to pick up a pair of Recaro seats out of an 80s Porsche 911 for around $45. Needless to say, they were in pretty rough shape. Knowing that I didn't want a black interior, and knowing I would have to re-upholster anything that I bought anyway, this was an excellent find! thank you Craigslist!
Once I got the seats home, I checked them to the interior to make sure there weren't any surprises (these seats are nearly identical to the Miata-style seats. Nothing to note, so we should be good to go!
In September of 2010, I ended up taking an upholstery class through a local technical college. I wanted to just learn the basics in order to hopefully be able to construct some of the more simple panels once I start doing the interior. After taking the class, I fully realize the art and experience that is involved in doing automotive upholstery, and will be paying (hopefully not dearly) on my seats to be done when I get to that point. For the class however, I had to work on one of the seats, so here is a 2 minute summary and some photos documenting that process as I went through it for the seat bottom.
Step 1: Disassembly - Carefully take off the seats glides, and remove all of the hog-ties that you can see. Carefully remove the covering from the foam and framework with special care not to tear any of the material. The covering of course later will be used for patterning for the new material.
Below is a shot of just the foam insert for the bottom of the seat. You can see the deep seams that make this look like 3 pieces of foam. Its these seams that will later allow you to pull the material down nice and tight along the center section (where your butt goes) in order to really define the side bolsters. The diagonal light spot you see pictured is actually where the seat heater element was layed in. At this point in time, I'm not sure about finding a replacement for my worn out element.

Step 2: Patterning - Using a seam-ripper and whatever other means, carefully go through all of the seams, and remove the stitching. This will free up each of the individual pieces that make up the specific design for your seat. From there you'll be able to layout flat all of these pieces, and transfer the shapes to your new fabric and begin re-assembling them in reverse order. NOTE: old covering material will have stretched quite a bit over time, this is where the experience in using specific materials comes into play in estimating how to allow for that stretch when transferring your patterns!

Step 3: Restoration - It's at this time that you have everything disassembled you can take time to re-finish the framework, and whatever parts will be visible later to make sure you have a nice end product. I took the time to sandblast, and repaint my frames/springs to make sure that they'll last another 20 years without rotting out, after all you dont want to fall through the seat and hit the floor when your going 120mph, right?!?

Step 4: Construction - So you've transferred your patterns, cut out all of your shapes, now on to the sewing machine!
Pictured below you'll see the center seat area that I began with, you can build depth into your pieces by using foam inserted as needed. NOTE: not all sewing machines can handle passing leather/vinyl + foam through the feed dogs, so check first if your machine can handle it before even starting your project!

After completing the seat bottom, I attached the sides, and so on in order to be able to re-wrap the foam... Here pictured is the seat and bolster tops laid in place prior to stitching the sides/front to the top.

So for the project, I also used a low-cost vinyl that I found at a local fabric shop. No use in using a high-cost leather to learn on right? Although, in terms of color, this was what I was initially thinking of going with as I begin looking at the color palette for the interior design.
Pictured Below is the final product at the end of the class (total 16 hours over 8 weeks). Overall the class I feel was a success in that I wanted to learn the techniques. I feel that my seat cover was a failure, just because I think it looks like crap! hahaha
This project was what taught me a ton about the material stretch and proper tolerancing of the material as you cut your patterns and leave seam allowances. Thank you Aresa for all of your time through the class, I learned a whole lot, especially in terms of the respect for the trade of Upholstery, it truly truly IS an art to be appreciated.


 One really nice thing about this system vs the old stock system is that this whole pedal assembly (including cylinders) fits within the car. This takes away the need for routing lines to the cylinders through the firewall, making the system much cleaner in the engine bay. This will require a little bit of modification on the dashboard sheet metal to fit the new componentry, and I'll try to post updated picks as I get to that portion.


 Here is a shot while I was cleaning up the rack and pinion for re-assembly. In the upper corner, you can see the very delicate brass gaskets that surround the bearing. I'm in process now of creating digital information to have new gaskets laser-cut locally as I dont think you can find these for purchase anymore.
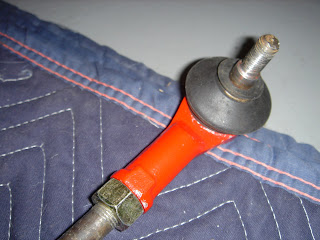
 Here is a more detailed shot of a cleaned up ball-joint vs. not clean. You can see the distance in looks that this goes with just a little bit of Thinner and a Sandblaster. Add a fresh-coat a paint to protect it for the future, and Rock-n-Roll!
 Here's yet another detail showing the Steering Column Bearing. Although I think this bearing has seen better days, I think it will be fine just being cleaned up and a little more grease added. Once I can investigate a little more on sizing, etc.. I may try to find a new replacement if at all possible.
 Upon completion, you can see what a nice fresh coat of paint will do for ya! These parts look like I just bought them new. Online I can pick up new rubber Gaters to replace the old rubber boots, this rack should be good as new.


