Monday, March 23, 2009

Pedals

I've managed to pull together from Ebay again a set of Tilton Racing Pedels along with Tilton Cylinders in order to once again keep costs down. This set new from Tilton would run somewhere in the vacinity of $600, using Ebay, I managed to get the pedal assembly for $150 with cylinders from another user for $20.
One really nice thing about this system vs the old stock system is that this whole pedal assembly (including cylinders) fits within the car. This takes away the need for routing lines to the cylinders through the firewall, making the system much cleaner in the engine bay. This will require a little bit of modification on the dashboard sheet metal to fit the new componentry, and I'll try to post updated picks as I get to that portion.


Friday, March 20, 2009

Wheels and Tires

I've been looking for the right wheels and tires (a good deal) for about a year now. I managed to finally find a set of 13x7 Magnesium Superlights out of Florida (Thanks Rod). Now that I'm going to a 7" wide tire, I'm needing to get a fit-up in place in order to properly determine what width spacer I'm going to need to run for proper clearances. Below are some images of the wheels purchased.


Friday, February 13, 2009

Steering


What your looking at below here is the Driver's side front without the steering arm attached. On the bottom of the image, you can see the Steering Rack linkage that is due to be cleaned up/repainted/reassembled for use.

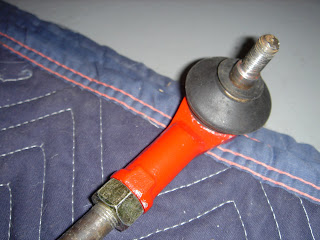
Here is a close-up of the rack linkage. You can see its withstood the test of time with the amount of rust on it. Upon disassembly, the balljoints seem to be in sound condition for re-use. I think with some TLC, some aesthetic cleanup, I think these parts will be roadworthy very soon.Here is a shot while I was cleaning up the rack and pinion for re-assembly. In the upper corner, you can see the very delicate brass gaskets that surround the bearing. I'm in process now of creating digital information to have new gaskets laser-cut locally as I dont think you can find these for purchase anymore.Here is a more detailed shot of a cleaned up ball-joint vs. not clean. You can see the distance in looks that this goes with just a little bit of Thinner and a Sandblaster. Add a fresh-coat a paint to protect it for the future, and Rock-n-Roll!Here's yet another detail showing the Steering Column Bearing. Although I think this bearing has seen better days, I think it will be fine just being cleaned up and a little more grease added. Once I can investigate a little more on sizing, etc.. I may try to find a new replacement if at all possible. Upon completion, you can see what a nice fresh coat of paint will do for ya! These parts look like I just bought them new. Online I can pick up new rubber Gaters to replace the old rubber boots, this rack should be good as new.


Wednesday, February 4, 2009

Floor Pans

Thanks to a great friend in my area, I managed to have brand new floor pans created in order to replace all of the old, tired metal in the bottom of my car.


Hopefully in the next days to couple weeks, I'll have an opporitunity to get these put in, then its on to the undercoating...

I've managed to attach the panels with self-tapping screws, this will allow me to have them held in place to ensure proper welding with the panels secured.


After Undercoating, we'll start talking about first fit-up with Engine to Body.


Friday, January 2, 2009

Happy New Year

Due to the house taking priority lately (small renovations, fixes) I've been pulled away from the car for quite some time. So I started off the year telling myself that I needed to hurry up and get a move on. I decided that in order for this to happen, I needed to just take a leap of faith and start getting some major things accomplished. Top of the list was getting the hood and front end separated from the main body of the vehicle. Because this car will have a flip-lid in the end, I took out the 'ole Sawzall and went to town cutting.


Here you can see some of the floor board in the back corner has been cut away. I recently purchased sheet material from a nearby steel yard, and enlisted some help locally in order to get some new floor pans fabricated. I'm hoping in the next few days/weeks to get these new pans installed. The addition of these new pans will surely help ensure that this body will be solid enough for the 400% power increase.


Pictured below is the hood/front end sitting on the floor next to the body of the car. I'll need to next fit these two pieces together with proper spacers, etc. Then have them welded into one piece vs. two that they are now. Later in the process, I can begin fitting up the brackets for the hinges, structural supports, flares, etc...

Wednesday, December 31, 2008

Trunk Space - Part 2

In doing a ton of research for ways to modernize suspension, I've learned quite a bit in terms of dealing with the rear end of the car. I've found this site called carbibles.com that has a very good description/explanation for many aspects of vehicle design, so I've taken some notes of what I've learned and of course am trying to update accordingly in order to balance the car for the amount of HP I'm adding to it while still maintaining it as a daily driver.

Currently, Minis were outfitted with a suspension system similar to this Hydrolastic setup;


Additionally, here is some reference from the Haynes Manual for Alignment of the subframes onto the body of the car.


Here is a sample image of some photos of a rear subframe I pulled off the net from someone else working on a resto.


While this setup allows this small car to have a very short suspension setup in the back, and comfortable riding at near any speed, the responsiveness for more aggressive driving really suffers. I'm looking at what mods will need to be done in order to achieve something more like a 4-bar shown below.

Modern racers have this typical setup due to the adjustability and stiffness of the setup. My design problem at hand will be figuring out how to eliminate the axel thru the center, and build more of a framed unit with fuel cell, battery, etc. all residing in the same real estate.
There is an outfit in England using motorcycle engines vs. Honda motors... this company makes this below framework to house the motor in the rear of the car, and still has a flat coilover system in order to reduce height of the suspension system. I'm thinking that there may be a possibility of building a similar framework, without the need for the motor, but substituting the motor for the fuel cell and battery location in my application.


Lately, SuperFastMinis has come out with a Rear Subframe Kit (approx $1000.00) that takes all of the existing parts and pieces, and replaces them with a fabricated sheet replica in order to incorporate a coilover suspension system in the rear of the vehicle. Below are some images from superfastminis.com of the product.


While this setup is awesome, my budget is really tight, so I'm going to try to utilize as many of the original parts as possible in order to cobble up a similar setup. Below you'll see some imagery of what will be needed to be done to the rear wells in order to make a shock tower. What's not shown here is that because we're going to a 7" wide tire, I'm going to need to widen the well prior to adding the tower. If I dont do this, 1. the wheel will sit out way too far. 2. The whole car will look 'jack'd up' in the back end, and I want my car to sit relatively flat with minimal rake.


Saturday, December 20, 2008

Licensing Ideas


I've been looking into what different kinds of license plates I can get in South Carolina due to this being a historic vehicle.  I'm very happy to report that because my car is technically a 1972 vehicle, I'm allowed to register the car WITH a '72 plate!  This is great news considering the following...

Here is a picture of today's 2009 South Carolina Plate:

Final 3M Plate Design 8-14-07.jpg

Here is a picture of the 1972 South Carolina Plate:

sc72-2.JPG.jpg

As you can see, this plate is going to look a ton better on a white car vs. the one above.

Wednesday, September 3, 2008

First Coats of Primer

Here is the car on its way to my friends to get a coating of Epoxy Primer. Funny thing to notice here is the tiny trailer I can fit this thing on...lol.


Here is the Master Joe Campbell laying on a fresh coating of Epoxy Primer... without a mask... in a garage... with poor ventilation... grass roots resto at its best! lol Joe ended up paying for that one later in the day. Folks, you always have to take necessary precautions when dealing with these chemicals. This primer causes nerve damage if left to prolonged exposure, dont take chances... do like your daddy told you and "wear your safety gear"!
Here is the car drying after Joe was finished. It was pretty nice to see the car with a nice even coat on it... like a light towards the end of a tunnel.

Now the car is back in my garage, and ready for the next stages to begin... more updates to come as I begin the cutting and patching!!!
Take care for now...

Blast-off!

Well, another week or so gone by... and I'm finally getting my car back from the media blaster. Due to the recent Hurricanes coming through, we've been getting a lot of rain causing me to keep the body locked up from the elements in order to not allow rust to begin again.

You can see here in this image the light vs. dark grey areas of the body. What your seeing in the dark areas is the effect of soda blasting. Baking Soda allows you to strip the metal of all paint/coatings while still maintaining good protection from rust. The light areas you see are from Sand. Sand is much more harsh to the metal as you can see... the abrasiveness of the sand removed much more, but the metal must immediately be coated once this is done.

Here is another image showing the underside of the front end. This is an extremely critical area due to this being a main mount point for the new VTech Subframe. The previous owner put in new floor pans, however, when doing so did not completely remove the bad metal. Instead, they double-paned the area by overlapping the new panel to the old. This could have all worked out, except that they didnt remove the front subframe when doing so, so in turn they encapsulated the bolts in place. I found all of this out of course when I was trying to locate the bolts in order to remove the frame weeks ago. Once I cut the bolts free I was fine... now will be the time to go back and fix this while all is visible to me.

The last two photos show more of the bottom of the car. This area of course has the most issues due to moisture, etc. What I'm deciding to do in this case is glass the whole bottom of the car vs. going in and re-welding all new panels in place. I've removed all signs of rust at this point, and by glassing the bottom I can ensure moisture will no longer be a problem, and the fiber-glass will actually end up being more stable than the sheet metal when all is said and done. Some of the other panels that look like swiss cheese I will replace accordingly.


Next thing to do is to have the body coated in Epoxy Primer. Regular Primer allows moisture to pass through the coating, Epoxy Primer will properly seal the surface giving me the time needed to complete all the body modifications and repair.